Mastering Docker Networking: A Deep Dive into Bridge, Overlay, and Host Modes

Introduction
In the world of containerization, Docker has emerged as an industry standard, enabling developers to package applications and their dependencies into lightweight, portable units. While container isolation is a core benefit, the true power of Docker often lies in its ability to facilitate seamless communication between these isolated containers, and between containers and the outside world. This communication is governed by Docker's robust networking capabilities.
Understanding Docker's various network drivers – particularly Bridge, Overlay, and Host modes – is crucial for designing scalable, secure, and high-performance containerized applications. Choosing the right network mode for your specific use case can significantly impact your application's architecture, performance, and operational complexity. This comprehensive guide will demystify these core Docker networking concepts, providing practical examples, real-world use cases, and best practices to help you master container communication.
Prerequisites
Before diving into the intricacies of Docker networking, ensure you have the following:
- Docker Engine Installed: A working Docker installation on your development machine or server.
- Basic Docker Commands: Familiarity with
docker run,docker ps,docker stop,docker rm. - Networking Fundamentals: A basic understanding of IP addresses, subnets, ports, and network interfaces will be beneficial.
- Linux Command Line Basics: Comfort with executing commands in a terminal.
Understanding Docker's Network Model
At its core, Docker creates virtual networks to enable communication. When you run a container, Docker automatically attaches it to a network. Each container gets its own network namespace, providing isolation from other containers and the host system. Docker uses a combination of Linux networking features (like network bridges, veth pairs, and iptables rules) to achieve this.
By default, Docker creates a bridge network named docker0 on installation. When a container is launched without specifying a network, it attaches to this default bridge. Docker assigns an IP address to the container from the bridge's subnet, and sets up veth (virtual Ethernet) pairs, one end inside the container and the other connected to the docker0 bridge. This allows containers to communicate with each other on the same bridge, and with the outside world via Network Address Translation (NAT) rules managed by Docker.
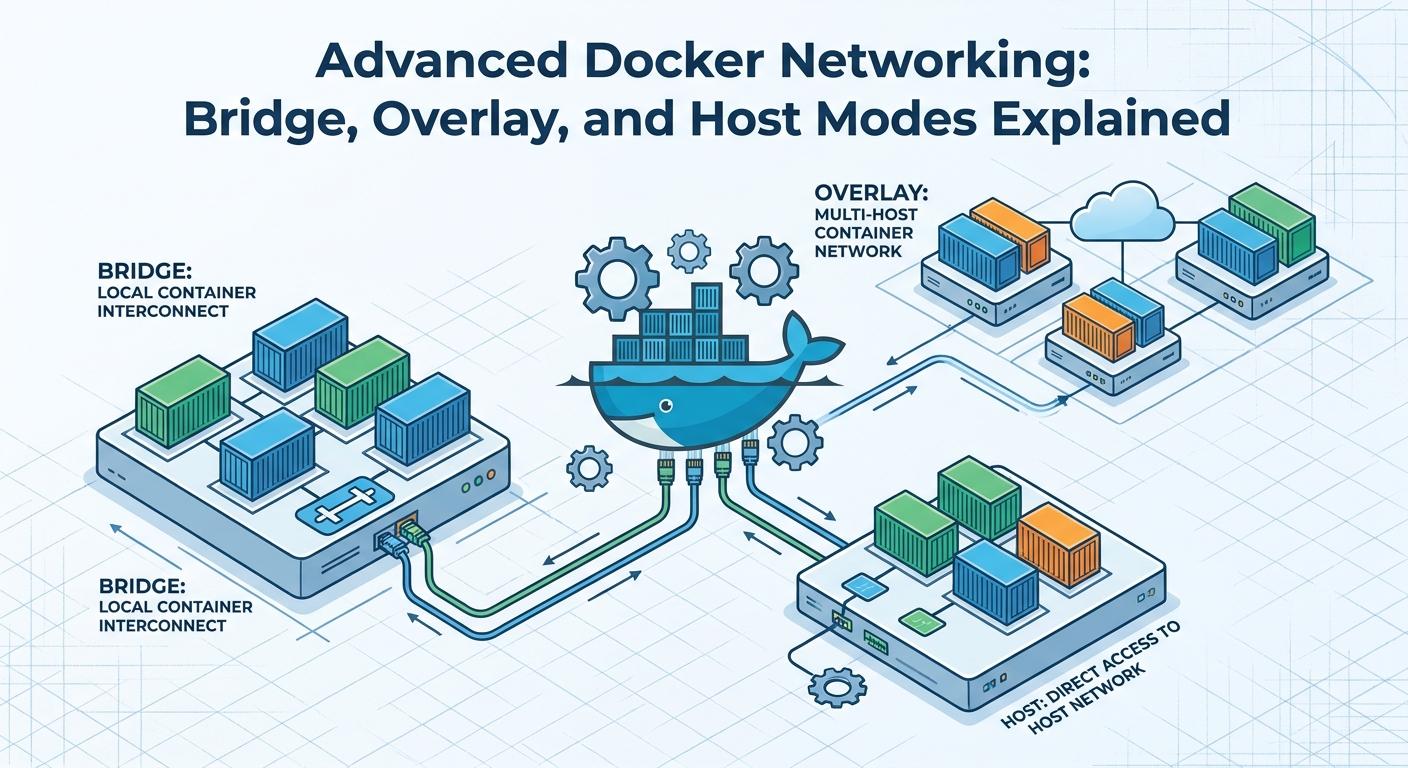
1. Bridge Network Mode: The Default Workhorse
Bridge networks are Docker's default and most commonly used networking mode for single-host deployments. They provide excellent isolation between containers while enabling communication.
How Bridge Networks Work
When you start a container, it connects to a virtual bridge interface on the host. This bridge acts like a physical network switch, forwarding traffic between containers attached to it. For communication outside the host, Docker employs NAT, mapping container ports to host ports, allowing external access to specific services running inside containers.
There are two main types of bridge networks:
- Default Bridge (
docker0): Automatically created by Docker. Containers on this network can communicate with each other via their IP addresses. However, for robust service discovery (by container name), user-defined bridges are preferred. - User-Defined Bridges: Created explicitly by the user. These offer better isolation, automatic DNS resolution by container name, and more control over network configuration. They are highly recommended over the default bridge for most applications.
Container-to-Container Communication
On a user-defined bridge network, containers can resolve each other by their service names (container names or service names in Docker Compose/Swarm). This simplifies application configuration as you don't need to hardcode IP addresses.
External Access and Port Mapping
To allow external machines to access services running inside a container, you must map a host port to a container port using the -p or --publish flag. Docker's iptables rules handle the NAT translation.
Advantages of Bridge Networks
- Isolation: Containers are isolated from the host and other networks.
- Ease of Use: Simple to set up and manage for single-host applications.
- Service Discovery: User-defined bridges provide automatic DNS resolution.
- Port Mapping: Securely expose specific services to the outside world.
Disadvantages of Bridge Networks
- Single-Host Only: Not suitable for multi-host container orchestration (e.g., Docker Swarm, Kubernetes) without additional solutions.
- Performance Overhead: NAT introduces a slight performance penalty compared to direct host access.
Code Examples: Bridge Networks
1. Using the Default Bridge (not recommended for production):
docker run -d --name my-web-app-default -p 80:80 nginx2. Creating and Using a User-Defined Bridge Network (Recommended):
First, create a custom bridge network:
docker network create my-app-networkNow, run a PostgreSQL database container and a backend application container on this network. The backend can connect to the database using its service name (db).
# Run a PostgreSQL database container
docker run -d \
  --network my-app-network \
  --name db \
  -e POSTGRES_DB=mydb \
  -e POSTGRES_USER=user \
  -e POSTGRES_PASSWORD=password \
  postgres:13

# Run a backend application that connects to 'db'
# (Assuming your backend app uses an environment variable DB_HOST)
docker run -d \
  --network my-app-network \
  --name backend \
  -e DB_HOST=db \
  -e DB_PORT=5432 \
  my-backend-app:latest

# Run a frontend application, exposing port 80 to the host
docker run -d \
  --network my-app-network \
  --name frontend \
  -p 80:80 \
  my-frontend-app:latest
To inspect the network and its connected containers:
docker network inspect my-app-networkUse Cases for Bridge Networks
- Single-host Applications: Ideal for deploying multi-service applications (e.g., a web server, database, and cache) on a single Docker host.
- Development Environments: Perfect for local development setups where you need various services to communicate.
- Local Testing: Quickly spin up isolated environments for testing components.
2. Host Network Mode: Maximum Performance, Minimal Isolation
Host network mode is the least isolated of Docker's network modes. When a container uses the host network mode, it shares the host's network namespace directly, meaning it doesn't get its own IP address or network interfaces. Instead, it uses the host's IP address and can directly access all of the host's network interfaces.
How Host Networks Work
In host mode, the container's network stack is essentially bypassed. There's no virtual bridge, no veth pairs, and no NAT. Any port opened by the container is directly opened on the host machine. For example, if a container running in host mode listens on port 80, it will bind to port 80 on the host's network interfaces directly.
Advantages of Host Networks
- High Performance: Bypassing the virtual network stack and NAT reduces overhead, leading to near bare-metal network performance.
- Direct Access: Containers have direct access to host network interfaces and services.
- Simpler Port Binding: No need for explicit
-pport mappings, as containers directly use host ports.
Disadvantages of Host Networks
- No Network Isolation: This is the biggest drawback. Containers in host mode are not network-isolated from the host or each other, posing security risks.
- Port Conflicts: If multiple containers or host services try to bind to the same port, conflicts will occur.
- Not Portable: Difficult to manage and scale, as it ties containers to specific host network configurations.
Code Example: Host Network Mode
# Run an Nginx container directly on the host's network stack
docker run -d \
  --network host \
  --name my-host-nginx \
  nginx
After running this, if you access http://localhost (or the host's IP address) in your browser, you will see the Nginx welcome page, assuming no other service is using port 80 on your host. Note that using -p 80:80 with --network host is redundant and will result in an error or warning, as the container directly attempts to bind to port 80 on the host.
Use Cases for Host Networks
- Performance-Critical Applications: Where every millisecond of network latency matters (e.g., high-throughput proxies, some real-time data processing).
- Monitoring Agents: Tools like Prometheus Node Exporter often run in host mode to access all host metrics, including network statistics.
- Network Appliances: Specific use cases where a container needs to behave like a network appliance, directly controlling host interfaces.
3. Overlay Network Mode: Scaling Across Multiple Hosts
Overlay networks are the cornerstone of multi-host container deployments, enabling seamless communication between containers running on different Docker hosts. This is particularly vital for orchestrators like Docker Swarm, which leverage overlay networks to create truly distributed applications.
How Overlay Networks Work
Overlay networks are built on top of an existing physical network (the "underlay" network). Docker Swarm uses VXLAN (Virtual Extensible LAN) encapsulation to create a virtual, distributed layer 2 network across multiple hosts. Each packet sent between containers on different hosts is encapsulated in a VXLAN header, allowing it to traverse the underlay network as regular UDP traffic. The Docker daemons on each Swarm node decrypt and re-route these packets to the correct container.
For an overlay network to function, Docker Swarm must be initialized, and all nodes must be part of the Swarm. Swarm managers also maintain a distributed key-value store (using Raft consensus) for service discovery and network configuration.
Prerequisites for Overlay Networks
- Docker Swarm Cluster: You need at least one Docker Swarm manager and one or more worker nodes.
- Open Ports: Ensure the necessary ports for Swarm communication (2377 TCP, 7946 TCP/UDP, 4789 UDP for VXLAN) are open between Swarm nodes.
Creating an Overlay Network
Overlay networks are created on a Swarm manager. Once created, they are automatically propagated to all other nodes in the Swarm.
# Initialize Docker Swarm on your manager node (replace <MANAGER_IP> with your manager's IP)
docker swarm init --advertise-addr <MANAGER_IP>

# Create an overlay network on the manager
docker network create -d overlay my-overlay-network
Deploying Services on Overlay Networks
Docker services (which manage multiple identical containers called tasks) are deployed onto overlay networks. Swarm handles the scheduling and ensures tasks can communicate, regardless of which node they land on.
# Deploy a web service with 3 replicas on the overlay network
docker service create \
  --name webapp \
  --network my-overlay-network \
  -p 80:80 \
  --replicas 3 \
  nginx:latest

# Deploy an API service with 2 replicas, also on the overlay network
docker service create \
  --name api-service \
  --network my-overlay-network \
  --replicas 2 \
  my-api-app:latest
Service Discovery and Load Balancing
Overlay networks provide built-in DNS-based service discovery. Services can communicate with each other using their service names (e.g., api-service can reach webapp). Docker Swarm also includes an ingress load balancer that distributes incoming traffic across all tasks of a service, even if they are on different nodes.
Advantages of Overlay Networks
- Scalability: Enables applications to span multiple hosts, allowing horizontal scaling.
- High Availability: Services can automatically restart on different nodes if a node fails.
- Service Discovery: Built-in DNS resolution simplifies inter-service communication.
- Load Balancing: Integrated load balancing for incoming traffic.
- Encryption: Overlay networks can optionally encrypt traffic between Swarm nodes for enhanced security.
Disadvantages of Overlay Networks
- Complexity: Requires a Docker Swarm cluster, adding management overhead.
- Performance Overhead: VXLAN encapsulation introduces a slight overhead compared to bridge or host modes.
- Troubleshooting: Can be more challenging to diagnose network issues in a distributed environment.
Use Cases for Overlay Networks
- Microservices Architectures: Ideal for deploying complex applications composed of many independent services.
- Distributed Applications: Any application that needs to scale across multiple physical or virtual machines.
- High-Availability Clusters: Ensuring application uptime by distributing services and enabling automatic failover.
4. None Network Mode: Isolated and Offline
When a container is launched with --network none, it is completely isolated from all network connectivity. It will only have a loopback interface (lo) and cannot communicate with other containers, the host, or the external network.
How None Network Mode Works
In this mode, Docker creates a container with its own network namespace but doesn't provision any external network interfaces. It's essentially a container without a network card.
Advantages of None Network Mode
- Complete Network Isolation: Offers the highest level of network security by preventing any external communication.
- Resource Efficiency: No network stack to manage, potentially reducing resource consumption for network-unaware tasks.
Disadvantages of None Network Mode
- No Connectivity: Cannot send or receive network traffic, severely limiting its utility.
Code Example: None Network Mode
docker run -it --network none alpine sh

# Inside the container, try to ping Google (it will fail)
ping google.com

# Check network interfaces (only 'lo' will be present)
ip addr show
Use Cases for None Network Mode
- Batch Jobs: Running computational tasks that do not require network access.
- Security-Sensitive Computations: For tasks where absolute network isolation is paramount.
- Debugging Network Configurations: To test a container's behavior when it has no network access.
5. Macvlan Network Mode: Direct Host Interface Access (Advanced)
Macvlan is an advanced network driver that allows you to assign a MAC address to a container's virtual network interface, making it appear as a physical device directly attached to the host's physical network. This means the container gets its own IP address on the physical network, bypassing the Docker bridge entirely.
How Macvlan Networks Work
Instead of routing traffic through a Linux bridge and NAT, Macvlan creates a new network interface for the container that is directly associated with a physical network interface on the host (e.g., eth0). The host's network interface then acts like a switch, forwarding traffic to the appropriate container based on its MAC address. Each container on a Macvlan network gets its own unique IP address from the subnet of the physical network.
Advantages of Macvlan Networks
- Near Bare-Metal Performance: Minimal overhead, as traffic isn't routed through a software bridge or NAT.
- Direct Network Presence: Containers behave like physical machines on the network, making them suitable for legacy applications that expect to directly control a network interface.
- No Port Mapping: Containers have their own IP addresses, so no port mapping is required for external access.
Disadvantages of Macvlan Networks
- Complex Setup: Requires careful IP address management and understanding of your physical network topology.
- IP Address Consumption: Each container consumes a unique IP address from your physical network's subnet.
- Parent Interface Requirement: The host's physical interface (parent) cannot directly communicate with its Macvlan children by default (though workarounds exist).
Code Example: Macvlan Network Mode
Assume your host's physical interface is eth0, your network subnet is 192.168.1.0/24, and your gateway is 192.168.1.1.
# Create a Macvlan network
docker network create -d macvlan \
  --subnet=192.168.1.0/24 \
  --gateway=192.168.1.1 \
  -o parent=eth0 \
  my-macvlan-network

# Run a container with a specific IP address on the Macvlan network
docker run -d \
  --network my-macvlan-network \
  --ip 192.168.1.100 \
  --name my-macvlan-app \
  nginx
Now, you can access the Nginx server directly at http://192.168.1.100 from any machine on your physical network.
Use Cases for Macvlan Networks
- Legacy Applications: Running applications that require direct access to a physical network interface or specific MAC addresses.
- Network Appliances in Containers: Deploying virtual firewalls, routers, or load balancers as containers.
- IoT Devices: Where containers need to be directly addressable on a local network without NAT.
Best Practices for Docker Networking
To build robust and scalable containerized applications, adhere to these best practices:
- Always Use User-Defined Bridge Networks: For single-host applications, user-defined bridges provide better isolation, automatic DNS resolution, and easier management than the default
docker0bridge. - Leverage Service Discovery: Within user-defined bridges or overlay networks, use container names (or service names in Swarm/Compose) for inter-container communication instead of hardcoding IP addresses. This makes your applications resilient to IP address changes.
- Network Isolation: Create separate user-defined networks for different application tiers (e.g.,
frontend-network,backend-network,db-network). This enhances security by limiting communication pathways. - Minimize Exposed Ports: Only map essential ports to the host. Each exposed port is a potential attack vector. Use
EXPOSEin Dockerfiles for documentation, but rely on-pfor actual host-port mapping. - Choose the Right Driver: Select the network driver that best fits your application's requirements for performance, isolation, and scalability (Bridge for single-host, Overlay for multi-host, Host for extreme performance/specific use cases).
- Implement Network Policies: For more advanced security, consider using network policies (e.g., Calico or Weave Net in Kubernetes environments) to define granular communication rules between containers.
- Monitor Network Traffic: Regularly inspect your Docker networks using
docker network inspectand use network monitoring tools to understand traffic flow and identify bottlenecks.
Common Pitfalls and Troubleshooting
Docker networking can sometimes be tricky. Here are common issues and how to troubleshoot them:
- Port Conflicts: If you get an error like
port is already in use, another process (either on the host or another container) is using the port you're trying to map. Usenetstat -tulnpon Linux to identify the culprit, or choose a different host port. - DNS Resolution Issues: If containers on the same user-defined bridge cannot resolve each other by name, ensure they are indeed on the same user-defined network. Verify service names. For multi-host overlay networks, check Swarm health and DNS configurations.
- Firewall Rules: Host firewalls (
ufw,firewalld,iptables) can block traffic to/from containers. Ensure necessary ports (e.g., Docker daemon port, Swarm ports, exposed application ports) are open. - Overlay Network Complexity: Issues with overlay networks often stem from Swarm setup (e.g., manager/worker communication, MTU mismatches). Check Swarm logs and ensure all nodes are healthy.
- Debugging Tools:
docker network ls: List all Docker networks.docker network inspect <network_name>: Get detailed information about a specific network, including connected containers, their IPs, and gateway.docker exec -it <container_name> ip addr show: Check a container's IP address and network interfaces from within the container.docker exec -it <container_name> ping <other_container_name>: Test connectivity and DNS resolution between containers.docker logs <container_name>: Check application logs for network-related errors.docker port <container_name>: See which container ports are mapped to host ports.
Conclusion
Docker's networking capabilities are powerful and flexible, offering a spectrum of options to suit various deployment scenarios. From the robust isolation of user-defined bridge networks for single-host applications to the scalable, multi-host communication enabled by overlay networks in a Swarm cluster, and the high-performance direct access of host mode, each driver plays a crucial role.
By understanding the "how" and "why" behind Bridge, Overlay, Host, None, and Macvlan modes, you are now equipped to make informed decisions when designing your containerized infrastructure. Always prioritize user-defined bridge networks for single-host deployments, leverage overlay networks for distributed microservices, and reserve host or Macvlan modes for specific performance or legacy requirements.
As the container ecosystem evolves, so too will networking solutions, with CNI plugins and service meshes (like Istio and Linkerd) offering even more advanced traffic management, security, and observability features. Mastering the fundamentals of Docker networking is your essential first step towards building resilient, scalable, and efficient containerized applications in any environment.
Written by
CodewithYohaFull-Stack Software Engineer with 7+ years of experience in Java, Spring Boot, and cloud architecture across AWS, Azure, and GCP. Writing production-grade engineering patterns for developers who ship real software.